Tuesday, December 11, 2018

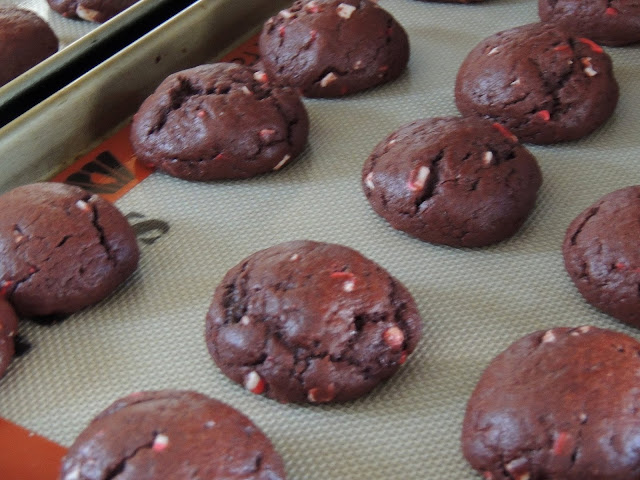
Peppermint Crunch Chocolate Pudding Cookies


The holiday season is in full swing, and we are thinking aaaallllllll about cookies right now!


I am a major lover of any and all things peppermint mocha, so it's no surprise that my first December baking adventure are fudgy, decadent peppermint crunch cookies.


This recipe for Peppermint Crunch Chocolate Pudding Cookies is truly the essence of the season. A package of devil's food pudding mix gives these cookies an irresistible fudginess and keeps them soft and tender for days and days. I love pudding cookies and have made them a couple of times before - the possibilities are endless!


The star of the show, however, are these awesome peppermint crunch chips from Andes that I found at the grocery store a week or two ago. Unlike just crushing up candy canes, these chips are a base of white chocolate with tiny bits of peppermint candy throughout. They are smooth and creamy, with just the right amount of crunch (no breaking our teeth here!) If you see these at your store, HURRY and grab them - they are just too good!


If I haven't convinced you yet, maybe these pictures will do the talking...


Cookie swaps, here we come!


Monday, November 19, 2018

Last Minute Thanksgiving Apps + Tried and True Recipes!


It's Thanksgiving week!!

I loooove Thanksgiving! I can't think of any better way to reflect on everything you're thankful for than with a bunch of really tasty food.


Of course, sometimes the idea of whipping up a big huge meal that is the center of attention for a whole day with close family and friends can be a bit stressful. Things fall through the cracks - this is natural. But trust me! Just a little bit of planning can make this day completely foolproof!


Today, I put together a round up of my favorite recipes that have seen plenty of Thanksgivings, Friendsgivings, the works! These are the recipes that have never let me down and are classic, delicious. and easy to whip up. But before we get to those, I also want to share two last minute, super simple appetizers for you to keep guests satisfied but not too full before the main meal! Pre-meal snacks are the one thing that can definitely fall by the wayside while you're focusing on the main event. These recipes take no time at all and won't steal any of your oven space day-of!

Thanksgiving Appetizers!


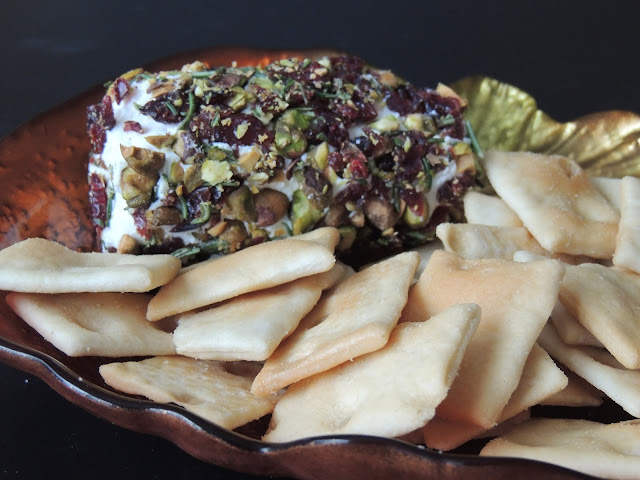
If you've been around Gas Stove Girl before, you know that I have a borderline unhealthy obsession with goat cheese. For my first quick and easy app, I am taking a humble log of goat cheese and jazzing it all the way up with some festive treats. You barely need a recipe for my Pistachio Cranberry Goat Cheese, but alas, here it is!

1 4-ounce log of goat cheese, at room temperature
3 tablespoons chopped pistachios
3 tablespoons chopped craisins
1 tablespoon finely chopped fresh rosemary
crackers for serving

On a small plate, combine the pistachios, craisins and rosemary. Take the goat cheese and roll it in the pistachio mixture until the outside is completely coated. You may need to roll it through a few times, pressing firmly to get the toppings to stick. Place on a decorative plate and chill until ready to serve. Set out with salted crackers and serve alongside a glass of champagne! 


The next appetizer I want to share with you is the best kind of party appetizer - so whether it's Thanksgiving or some other holiday gathering, you're going to want this in your arsenal! It's Cheddar and Chive Mini Quiches, and why is it the best, you ask? There are a few reasons: first, this recipe is delicious either warmed up or at room temperature. Second, it uses a grocery store shortcut which allows us to pull the dish together in no time at all. And lastly, you can make it ahead, freeze it, and warm it up when you're ready! Win, win, win.


1 14-ounce package pie dough (there should be 2 sheets per box)
2 tablespoons butter
1/4 cup chopped onion
3/4 cup half and half
2 eggs
2 tablespoons snipped chives
2 tablespoons shredded cheddar cheese
salt and pepper to taste
cooking spray

Preheat oven to 375 degrees. Spray a 24-cup mini muffin tin with cooking spray. Unroll the pie dough and cut out 24 rounds using a 2 1/2 inch round cookie cutter. Press the pie rounds into the cavities of the muffin tin.

Heat the butter in the small skillet over medium heat. Add the onions and cook until softened and golden brown, around 5 minutes. Spoon the onions and remaining butter into a large bowl. Add the half and half, eggs, chives, cheese, salt and pepper. Whisk until completely combined. Transfer the mixture to a vessel with a pourable spout. Pour the eggs into the muffin cups, filling just to the top of the pie crust. 

Bake for 15-20 minutes until the quiches are puffed up and turning golden brown along the edges. Remove from the oven to cool. Serve warm or at room temperature. If freezing, cool completely before transferring to a freezer-sized zip top baggie. To re-heat, place on a baking sheet and bake at 350 for 7-10 minutes until warmed through.


Tried and True Recipes!


So, you're doing it - you're hosting your first Thanksgiving! You're going to do an absolutely amazing job! But, if you're still looking for a few last minute recipes to pull the whole meal together, here's what I like to have handy.

Turkey - I did a step by step breakdown of my approach to the bird here. You can use this approach for a full-sized turkey or a bone-in turkey breast for a smaller party (just cut down the cooking time as needed).

Stuffing - I don't stuff the bird, but I do make the Pioneer Woman's Cornbread Dressing, excluding the cornbread and using a tad more of sourdough and french bread. It's just right. No need to mess with it.

Mashed Potatoes - for potatoes, I don't really use a specific recipe, but my #1 tip for super creamy mashed potatoes is to use yukon gold potatoes instead of the classic idaho variety. They are sooo smooth and easy to mash. Try boiling about 5 pounds of peeled gold potatoes until tender. Then, mash them up with 4 ounces of cream cheese, a few spoonfuls of sour cream, 1/2 cup or less of milk, plus lots of salt and pepper. Spoon the mashed potatoes into a baking dish, and warm them up with all the other sides while the turkey is resting!

Cranberry Sauce - I am team homemade cranberry sauce! I like this chutney recipe, and sometimes I will replace the orange juice with orange liquor for an extra kick! Yummy!

Other Sides - If you're looking for something a little different that still has the tried and true flavors of Thanksgiving dinner, consider my Pearl Cous Cous with Caramelized Mushroom and Sage Brown Butter. It's a little lighter (NO heavy cream, yay!!) but the flavors are rich and meaty - a perfect pairing for turkey!

Pies - Look, if you want to make a pecan pie, just make The Pioneer Woman's recipe. It is delicious, decadent, perfect. And if you love pumpkin pie but are looking for something a little crazy to wow your guests, may I recommend this S'mores pumpkin pie?! Classic pumpkin pie filling atop a buttery graham cracker crust, topped with golden brown gooey marshmallows and a dreamy chocolate ganache.

Happy Thanksgiving, Everyone! I am thankful for YOU!!

Wednesday, October 31, 2018

Pumpkin Pie Ice Cream


I can't think of a better recipe for Halloween!


It's Pumpkin Pie Ice Cream!! And it is deeelicious!! And worthy of all these exclamation points!!


As long as you have an ice cream maker, you are just a few steps away from this pumpkin ice cream. Like the other ice creams I have shared on the blog previously, this is a simple ice cream - which basically means it is a base of milk and cream, with no fussy eggs to temper and thicken. A combo of pumpkin pie spices, like cinnamon, nutmeg, ginger and cloves, give a classic summer treat a tasty fall-ready make-over.


Because this ice cream includes canned pumpkin, which has a bit of water content, I do take a few extra steps before churning the ice cream base. First, I combine the sugars and dairy in a saucepan and warm it to 170 degrees. This will allow the sugars to melt and thicken the cream slightly without scorching. After completely chilling the ice cream base and the pumpkin mixture, I mix the two together along with a splash of pumpkin liqueur. The liquor will keep the consistency of the ice cream from becoming too icy as a result of the water in the pumpkin puree. It's science! You can leave out the booze if serving this to children, just keep in mind you may find the texture a tad icier (still delicious, though).


As for serving this ice cream, I think it is so flavorful and tasty that it can stand alone on it's own. But, I 100% would NOT judge if you threw in some crumbled gingersnaps, drizzled a bit of caramel sauce on top and added some whipped cream for good measure. Tis the season!


Here's what you need for Pumpkin Pie Ice Cream* (Print Recipe!)

2 cups heavy cream
1 cup whole milk or half and half
1 teaspoon vanilla extract
3/4 cup granulated sugar
1/4 cup dark brown sugar
1/2 cup pumpkin puree
1/2 teaspoon cinnamon
1/4 teaspoon nutmeg
1/4 teaspoon ground ginger
1/8 teaspoon or less ground cloves
1 tablespoon pumpkin liqueur (bourbon would work, too)

Here's what you do

In a medium saucepan, combine the cream, milk, vanilla, and sugars. Affix a candy thermometer to the pan and gently bring the mixture up to 170 degrees. Stir frequently. Once up to temperature, transfer to a heatproof bowl and cool to room temperature. Chill in the fridge overnight. In a small bowl, combine the pumpkin and the spices. Place in the refrigerator to chill as well.

Spoon a little bit of the cream mixture into the pumpkin and stir until smooth. Combine with the remaining cream mixture and stir in the liqueur. Churn in your ice cream maker according to manufacturer instructions (for me, about 15 minutes). It will be like soft serve immediately after churning. I prefer to freeze for at least 4 hours in a freezer-safe container before scooping and enjoying.


*Adapted slightly from Food Network


Monday, October 1, 2018

Creamy Lemon Pasta with Roasted Salmon and Peas


What is it about a creamy, dreamy pasta dish that can turn a bad day upside down?


This particular recipe is exactly what I want to be eating right now. It's bursting with fresh lemon flavor, but at the same time it is the perfect comfort food dish thanks to a decadent bechamel sauce and buttery roasted salmon. We aren't diving head-first into rich wintertime casseroles, rather we're tip-toeing into what is (in my opinion) the best time of year for cooking. 


Let's talk about this Creamy Lemon Pasta with Roasted Salmon and Peas. Surely it is reminiscent of pasta carbonara, with a super creamy sauce (though not from eggs), a rich fatty protein (this time salmon over bacon), and little bursts from frozen peas. For the pasta, I used bucatini which I just love particularly for it's chewier, sturdy texture. It holds up extremely well to our cream sauce, which is made all the more irresistible on account of it starts with sauteed garlic and sliced leeks in a bit of butter and olive oil before finishing with a generous sprinkle of lemon zest and juice <3 


Oh, and by the way...the salmon? It is AMAZING on it's own, a dinner in and of itself. We are simply taking it to the next level by breaking it up and tossing it into this pasta dish. I roast the salmon skin side down on a sheet pan lined with parchment paper and drizzled with olive oil. Then, I generously season the flesh with salt, pepper, and dried thyme. Lay a few lemon slices over the top before baking and viola! Perfectly cooked, ridiculously simple salmon. 


Let's bid farewell to summer and welcome fall with this fresh and cozy pasta! 


Wednesday, August 29, 2018

Key Lime Cheesecake


We are making a cheesecake today!


This particular variety is, in fact, a Key Lime Cheesecake, and it is the perfect dessert to celebrate the end of summer.


Key Lime Cheesecake is exactly what it sounds like. It is a classic cheesecake, pumped up with the refreshing taste of lime juice and zest. A graham cracker crust is absolutely essential. And, also, this may or may not be a cheesecake with which I won an office bake-off (spoiler: it is!)


Now, look. I am no master baker. For a long time, cheesecake seemed like one of those dishes that you just leave up to the professionals. I first dipped my toes into the cheesecake world with a pumpkin cheesecake around Thanksgiving a couple of years ago and it went surprisingly well and was also insanely delicious. Fast forward to today, I am no longer totally petrified of cheesecake, thanks to a few key tricks I learned. For a smooth and creamy cheesecake that sets up perfectly, doesn't run all over the oven and doesn't crack down the center, always be sure to do the following:


- Bring ALL ingredients to room temperature, and make sure your cream cheese is very well softened (but not melted). Room temperature ingredients blend together so much better, and things are less likely to seize or congeal.

- If you are making a homemade crust, such as graham cracker, chocolate wafer or ginger snap crusts, be sure to pack it into the bottom of the pan VERY well. I like to use the bottom of a measuring cup. This ensures the crust goes out to and up the edges, and also has no cracks or holes.

- Do not over mix ingredients. Mix until smooth and thoroughly combined, but do not whip at high speed! Whipping the ingredients will introduce air bubbles into the batter, which burst in the oven and ultimately lead to the dreaded crack down the middle.

- After making the filling, tap the bowl on the countertop with some force about 30 times before pouring into the crust. The purpose of this is again to release any lingering air bubbles.

- Double line the outside of your springform pan with aluminum foil. You want to be absolutely sure that no filling will run out and no water from your water bath seeps in. The water bath should come up about halfway to the foil line.

All you need to do is follow these techniques, as well as being sure to follow any written measurements, for a truly irresistible cheesecake. This cheesecake is sooo creamy, yet is still light and refreshing from the citrus. The graham cracker crust is a perfectly sweet compliment to the tart lime juice. If you like whipped cream, feel free to garnish the top with a few squirt of whipped cream! I needed to make sure this particular cake traveled well, so I decorated it simply with a few extra graham cracker crumbs and a lime wedge!


The upcoming holiday weekend is the perfect time for a big baking adventure, and I think you are ready for cheesecake!! Let's get cooking.

Saturday, August 25, 2018

The Best Virtual Invitations For Your Next Party


I absolutely love entertaining! I never thought I'd love being a hostess, but as I've gotten older. learned to cook new dishes, and amassed a collection of dinnerware and serveware, I crave having friends and family over. Whether it is celebrating a special occasion, a holiday, or a dinner party just because, any reason to gather around the table is good enough for me.


Of course, the style of party I've thrown over time has certainly grown and evolved. While it used to be an excuse to have people over and throw back a few drinks, now I love the idea of a more classy soiree with an intentional theme or decor. Kitschy cocktail napkins are something I truly can't resist. Lots of party supply stores have come out with the cutest paper plates, cups, and silverware that makes entertaining with easy clean-up easier than ever before. 


But there is one element of planning a gathering that hasn't quite caught up with the rest. That is the invites! Surely, the easiest way to reach a crowd without sending out physical invites is through a Facebook event...but there's no denying that it doesn't quite measure up in terms of style. Finally, we have a solution! 


Paperless Post is a company specializing in online stationary to help connect people in real life through thoughtful, personal and well-designed virtual cards and invitations. I have been both a user and a recipient of countless Paperless Post invitations, and it couldn't be any easier! 


The first thing you notice when you get onto Paperless Post is just how simple it is to find exactly what you're looking for. Whether you are scheduling a casual movie viewing party with a group of girlfriends, organizing a company holiday party, throwing a birthday party, sending out a moving announcement, or looking for the perfect thank you card, Paperless Post has countless options - including Flyer, which is a collection of free designs you can use anytime!


Paperless Post has also partnered with top designers to curate some of the most beautiful and precious invitations, like this Kate Spade Ice Cream design I am using for an upcoming Labor Day barbecue! I added a background that reminded me of a picnic, to reinforce the outdoor locale! These invitations are so colorful that I was able to ensure the invites would be cohesive with any decor, food, and cocktails offered at the actual event!


There are countless ways to customize your invitations, including the text, the backdrop, the envelop and liners. Embrace the default styles they created, or change things up to perfectly match the theme of your event! Oh, and they even have photo card options perfect for wedding or birth announcements, holiday cards, or birthday parties! Once you create an account, you can also save a list of your favorite invites and see all your prior invites (both sent and received!)

As if the loveliness of the cards weren't enough to convince you to use Paperless Post for your next get together, did I mention how easy it is for your guests to reply and stay in touch with you as the host?! Once invites are sent, recipients receive an e-mail to view the invitation and are able to choose right in the invitation whether or not they can attend. All cards also have the option to add a comment and show the attendee list; you can also add your phone number, a map of the location, and a gift registry! It is a truly complete invitation experience without all the paper, licking envelopes and stamps, and waiting for the mailman! 

Have you used Paperless Post before? What was the occasion? 

Check back later in the week for a Key Lime Cheesecake recipe that will be perfect for your own end-of-summer BBQ!

This post was created in sponsorship with Paperless Post. I received coins in exchange for my review, but all words, experiences and opinions are my own.


Thursday, June 28, 2018

Hot Crab Dip


Here's where I see myself for the rest of the summer:


Evening time, dining outside with good friends, eating a big dish of this Hot Crab Dip with crostini and celery for dipping, plus a chilled glass of white wine to wash it all down.


Yes, seriously. This dip is the real deal. Bring it to your next potluck or BBQ or game night and watch it disappear.


Like any good dip, this one is creamy and cheesy, melty and bubbly. Fresh lump crab meat is mixed into every bite. I amp up the flavor with a few sprinkles of smoked paprika, a glug of Worcestershire sauce, and a shake of celery salt. 2 types of cheese give this dip a little something extra-special: parmesan, for a salty nuttiness, and muenster, for the ultimate meltiness (YES, cheese. I know we aren't supposed to be combining cheese and seafood but for some reason, hot crab dip is a very delicious exception to this rule).


Besides the fact that this dip is so. ridiculously. delicious, it is also sure to become one of your all-time favorites because of how super simple it is to make! Just mix it up, spoon into a casserole dish, sprinkle with parm and bake until golden brown and bubbly. That's it. A few stirs and a little patience is all that stands between you and a perfect summer dip :-)


Here's what you need for Hot Crab Dip* (Print Recipe!)

8 ounces lump crab meat
4 ounces cream cheese, softened
1/4 cup sour cream
1/4 cup mayonnaise
1 tablespoon lemon juice
1 teaspoon Worcestershire sauce
2 green onions, white and light green parts only, thinly sliced
1/2 cup grated parmesan cheese, divided
1/2 cup grated meunster cheese
1/2 tablespoon smoked paprika
1 teaspoon celery salt
cracked black pepper to taste
crostini and veggies for serving

Here's what you do

Preheat oven to 350 degrees. In a medium bowl, combine all ingredients except 1/4 cup of parmesan and stir until well combined. Pour into a small casserole dish and spread smooth. Sprinkle remaining parmesan on top and bake for 25-30 minutes until bubbling and golden brown. Garnish with additional green onions or paprika if desired and serve with crostini and vegetables.

Note - depending on the size of your casserole dish, you may want to place the dish on top of a sheet pan to prevent oven spills. This may add 5 to 10 minutes to your cook time.

*Adapted slightly from Will Cook for Smiles


Monday, June 25, 2018

Fried Goat Cheese Salad


Sooo, 3 of my last 5 recipes have included goat cheese. I'm just a tiny bit obsessed...


This, however. THIS is the recipe for only the BIGGEST lovers of goat cheese. Those of us who order a dish at a restaurant simply because there's goat cheese in it. Anyone who can make a meal of crackers with goat cheese and fig jam. Someone who understands that the funky tang and creaminess of goat cheese is something you can't get anywhere else.


This is a Fried Goat Cheese Salad and it is basically everything I have ever wanted. It is tangy, tart, sweet, and crunchy. Although there is a little bit of work involved to bread and fry the cheese, it's an elegant appetizer or meal that can be made in no time at all with just a bit of planning.


Besides the goat cheese, which, no doubt, is the star of this dish, this salad is made up of some very simple but very delicious ingredients. I like mixed field greens as the base, topped off with a sliced green apple, toasted walnuts, dried cranberries, finely crumbled feta, thinly sliced scallions and your favorite balsamic vinaigrette. If goat cheese doesn't tickle your fancy, this salad base would be just as delicious with grilled chicken or shrimp!


To be sure the goat cheese fritters stay together, keep their shape and don't melt all over the pan, you want to be sure to freeze the cheese at 2 different intervals. First, after slicing into rounds and then again after breading. I did notice that the egg at times would slide right off the goat cheese round. The best way to avoid this and get a really strong breading is to beat the egg vigorously until totally combined. Beyond these minor modifications, if you've ever breaded chicken before - you can absolutely make this! And you should! Seriously, I am soooo obsessed with this recipe! I hope you are too!